
Dual monitors can significantly improve your computer’s viewing experience, but with only one HDMI port on your computer, how can you extend the display to an additional monitor? While there are several options you could look into, for many people, a splitter is the first thing they think of. Unfortunately, using a splitter can come with some issues.
An HDMI splitter can’t extend the display to two monitors. What a splitter does is mirror the original image to 2 or more displays. A USB-to-HDMI adapter may effectively add a second HDMI port, which will extend the display. However, not all computers are able to output to a display via a USB port.
A splitter may seem like the right tool to extend your display, but it’s not suitable for the job. Splitters do have their purpose, and if you are trying to duplicate the display, they are perfect. But, HDMI splitters are limited by specific legal protocols. This makes them incapable of truly splitting the signal.
How to Extend the Display to Two Monitors with 1 HDMI Port
To properly extend an image onto a second display, you need an adapter. This will transform one of your USB ports into an HDMI out which means you will need access to a USB port for everything to work. Because one HDMI port can’t extend your display, you’ll need an adapter to accomplish this task.
Fortunately, there are plenty of easy-to-use and reliable adapters on the market. Products like the Cable Matters USB-to-HDMI Adapter (on Amazon) are perfect for this type of issue. Adapters are easy to use and follow a simple plug-and-play setup. What this translates to is a simple solution to your problem.
There are also other types of adapters that work with different ports including the USB-to-VGA, Thunderbolt to HDMI, as well as adapters that use USB 3.0. Furthermore, if USB ports are at a premium, you could always purchase a USB hub.
These will effectively allow you to use multiple adapters to power multiple displays. Hubs like this one (on Amazon) are easy to use, more importantly, the USB hub is crucial if you intend to keep your dual displays.
This is because it will put a port out of use. Keeping this in mind will help you manage your ports and not run into any issues down the road.
Note: Some Computers Can’t Support Some External Monitors
As if the situation needed to be any more complicated, be sure and remember that your computer’s actual computing ability is going to limit (or allow) you to extend the display where you want.
We’ve tried to connect cheaper Lenovo laptops to curved ultra-wide displays, for instance, only to find that the graphics card in the laptop can’t support the resolution of the ultra-wide. So which technical features should you have on your radar?
- Your computer’s graphics card/graphic capabilities: Ensure that your graphics card is capable of running dual monitors and has more than one port if it supports a multi-monitor setup. While many laptops have “integrated” graphics, not a discreet graphics card, you can still look up the processor’s external monitor capabilities.
- Monitors: Check that your monitors are compatible with HDMI and have the same resolution and refresh rate. If you get to the back of a nice big ultra-wide monitor only to find that the only input option is displayport, you’ll need another adapter (on Amazon).
- Cables: Purchase high-quality HDMI cables that are compatible with the resolution of your monitors. This goes for adapters too. If everything should be working, but it’s just not, then it’s probably one of your cables or hubs that is downgrading the signal.
By keeping these factors in mind, you can ensure that your dual monitor setup is optimized for performance and productivity. And the more steps there are in the process (the more cables and adapters), know that that increases the chances of an issue here.
How To Configure Dual Monitors On The Most Common Operating Systems

So, assuming you can actually connect your devices with the approbate adapters and ports, you still have to solve the software problem of getting everything to look right! So, for each of the most common operating systems, here are some quick ways you can manage you’re newly extended display to get the most productivity out of it:
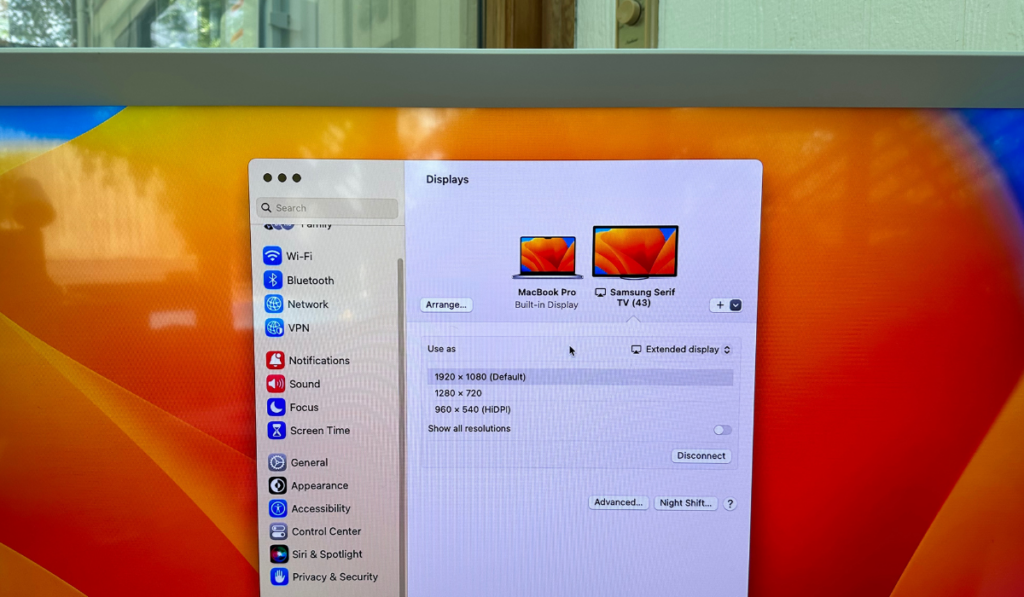
How To Configure Dual Monitors On Apple/MAC
- Connect your monitors to your Mac using HDMI cables and adapters if necessary.
- Open the Apple menu and select System Preferences.
- Click Displays and then click the Arrangement tab.
- Drag the monitors to the desired positions and adjust the resolution and scaling as needed.
- Check the “Mirror Displays” box if you want the same content to appear on both monitors (but probably what you want to do is “extend” the display to extend your working area).
- Click Apply to save the changes.
How To Configure Dual Monitors On Windows/PC
- Connect your monitors to your PC using HDMI cables and adapters if necessary.
- Right-click on your desktop and select Display Settings.
- Click on the “Multiple displays” dropdown menu and select “Extend desktop.”
- Drag the monitors to the desired positions and adjust the resolution and scaling as needed.
- Click Apply to save the changes.
How To Configure Dual Monitors On Linux
- Connect your monitors to your Linux machine using HDMI cables and adapters if necessary.
- Open the terminal and enter the command “xrandr” to list the available displays.
- Identify the names of the displays you want to use and enter the command “xrandr –output [display name] –auto –right-of [other display name]” to configure the displays.
- Adjust the resolution and scaling as needed using the same command with additional arguments.
- Save the changes to your xorg.conf file to make them permanent.
A Quick Note On Monitor Modes (Extend, Mirror, etc.)
When setting up dual monitors with HDMI, it’s important to understand the different monitor modes available to you. The most common monitor modes are:
- Extend: This mode allows you to extend your desktop across both monitors, providing more screen real estate and allowing you to multitask more efficiently.
- Mirror: This mode duplicates your desktop on both monitors, providing the same content on both screens.
- Second (or Main) screen only: This mode turns off your primary monitor and displays content only on your secondary monitor. Or, it does the opposite! Why would you want to connect to a monitor you then leave off? We don’t know…but now you know how to!
To switch between these modes, you can use the display settings on your operating system that we detailed above. Again, you almost certainly want “Extend,” but now you know what these words mean and that you have some options!
Why You Can’t Use an HDMI Splitter to Extend the Display to 2 Monitors


A splitter does exactly what it advertises. It takes the HDMI signal and splits it into two or more of the same image but it doesn’t extend the display. It’s duplicating the display to two receiving screens, so, this is more like mirroring your display. As many users have been disappointed to find out (forum link), a splitter does just that: splits. It allows you to duplicate an HDMI signal, but not extend a display to multiple displays.
Why is this? To understand we have to go deeper into how HDMI splitters work. While this may not seem like a challenging task, it can come with some roadblocks. The first one being HDCP. HDCP, or High-Bandwidth Digital Content Protection, is protection security that comes standard in most HDMI systems.
This protection helps to keep media pirates from copying content via HDMI. Devices need to be HDCP certified for them to be able to pass the signal along. Because of this, any piece of your system that touches HDMI needs to be HDCP certified.
Consequently, if they are not HDCP certified, you will either get a black screen or a message indicating the lack of certification. The problem that occurs with cheaper HDMI accessories is that they are not certified. The certification costs money, something that cheap producers are not willing to shell out. But, what they do is find a fix.
Some HDMI splitters can take advantage of an HDCP loophole, by bypassing the HDCP encryption with something known as a fallback. When the signal goes through the non-HDCP compliant splitter, it “falls back” to a lower resolution instead of showing a black screen. For example, a 1080p signal splits into two 720p mirrored screens.
One thing to look out for is the labeling on the device. If you see something like “1×2” or “1×4,” it is a good sign that you are looking at a splitter; this is a dead giveaway. While a splitter can’t extend an image, some products can.
Extending the Display with a USB-Dock


If you plan to make your dual displays permanent, you may want to purchase a USB dock. These devices often stay stationary and handle multiple types of connections and ports. For example, a USB dock will feature more USB ports, a 3.5 mm Audio Out, Display Ports, USB-C ports, and a few other things.
While a one-off adapter may solve the problem, a dock will serve as a more suitable solution. This is because they are standalone products that can reliably extend the ports and displays.
They add the necessary HDMI out and come with a convenient array of other ports.
It is also a more suitable solution if your system is relatively stationary. A USB hub can sit on your desk and be used with a laptop when needed or attached to a desktop unit.
A couple of great options for the Mac and PC are the Lention USB-C Multi-Port Hub (on Amazon) as well as the Plugable USB 3.0 Docking Station (on Amazon). You don’t need much. A simple option like the one pictured above has just a few ports out, but just the ones you need: HDMI, USB-C, and an extra USB port.
Pro Tip: If you use a USB-C port on your laptop which also uses that USB-C port to receive power, be sure that the dock has another USB-C port with power pass-through, so you can still power you’re device while extending the display over HDMI.
It is worth noting that most USB hubs can work on either a Mac or PC. What you should look out for is the type of USB. For example, newer Macbooks and Mac computers will feature only USB Type-C. In contrast, while you may still find USB-C on PC builds, you may also have a USB 3.0 port.
There are also products, like the EUASOO Docking Station (on Amazon) that can support up to three HDMI outs. This means you can have triple monitors that can extend your display.
Connecting It All Together
If you want to extend your image and use dual displays, a splitter just won’t work. A splitter can split the image into two duplicates but can never extend the image.
To do this, you need an adapter. But, if you are looking for a stationary solution, maybe a USB docking station with access to multiple ports is a better option.
With the right hardware, you can easily set up your monitors exactly the way you want them. Just a little understanding of what all these technologies do can really help when it comes time to purchase hardware.