
Whether you’re adding to your current system or setting up a new one, learning the proper way to splice a cable can be an indispensable skill for your security camera project. Teaching yourself how to do this can save you both time and money.
Splicing security camera cables is easy, and requires only simple tools like wire strippers and cutters. Regardless of cable type, with practice and proper know-how, you can quickly and efficiently splice your own cables.
It may seem like a challenging endeavor, but the act of splicing can be learned quickly with just a handful of steps. You might even be surprised to find out that splicing can be skipped altogether when using a coupler. Whether you opt to splice your cables or not, it is essential to understand what these security camera cables do for your system and how they’re configured (our guide).
What is a Security Camera Cable?


Essentially, a security camera cable is a glorified type of wire that transfers information throughout the system, in fact, many security cameras can actually be turned into wireless units as well (our guide) . These cables deal with video and audio.
There are two main types of cables:
- Ethernet/CAT5/CAT6 – By and large, the most popular choice for today’s security camera setups. These are the same cables that provide hardwired internet. They contain four sets of twisted wire pairs wrapped inside insulation. It works, and it’s cheap, with options like the SolidLink CAT5e 1000ft (on Amazon) going for about 5c/ft.
- RG59 – These cables were once the industry standard and can still offer benefits to your system. RG59 coaxial cables are similar to the coaxial cables used for your tv, but they are often made out of a higher grade copper. They consist of a reliable copper gauge or copper plated wire encased in insulation layers and wire braiding. RG59 cable can be found for pretty cheap too, with an option like FiveStarCable 500 ft. RG59 (on Amazon) coming in just at 10c/ft
Most systems will use CAT5 ethernet cables for their ease of use and set-up. RG59 cables can offer better shielding against interference and longer distances between connections. And both cables can transmit high-quality video and audio.
It is essential to note the difference between these data cables and power cables. Some CAT5 enhanced cables can provide power to your cameras. In most cases, you will have to run separate wires. A popular option if using RG59 is Siamese Cable (on Amazon). This type of cable offers both an RG59 and a power cable; all encased in insulation together.
For this article, we are going to focus on splicing just the RG59 and ethernet cables. And more information on security camera cables, check out this video.
How to Splice Security Camera Cable
Splicing cables is an effective way to join two wires. It is also a straightforward process that only requires a short list of tools.
Here are some tools you might need:
- Wire Strippers (on Amazon)
- Wire Crimper (on Amazon)
- Butt Splice Crimp (on Amazon)
- Utility Knife (on Amazon)
- Heat-Shrink Tubing (on Amazon)
- Electrical Tape (on Amazon)
- Heat Gun (on Amazon)
- Soldering Equipment (on Amazon) (If not using butt splice)
Depending on your job and what type of cable you are splicing, you may omit some of these.
Before attempting any splice, it is good practice to power down your system. While most of these wires are not necessarily live, limiting your short circuit risks can protect your system and you.
Splicing vs. Using Couplers
The simplest solution for joining two cables is to use a coupler. Cables fitted with connectors on both ends can use a coupler. Depending on your cable you will need different types of connectors:
- Ethernet/CAT5 cables can be fitted with an RJ45 Coupler (on Amazon). This is a simple piece of equipment that consists of two female RJ45 connectors fixed inside a small plastic housing. Simply plug in your cables on either end, and you are good to go.
- RG59 cables have an even simpler coupler solution. These RG59 Couplers (on Amazon) connect the two ends of the cable with double-ended coaxial lugs. It’s as easy as screwing one end into the other.
When it comes to which is better, couplers or splicing, it’s all about the convenience. If you already have the connections set up on your cable, a coupler will save you the extra steps of manually splicing it. Each method will result in an effective splice.
How to Splice Ethernet Cable
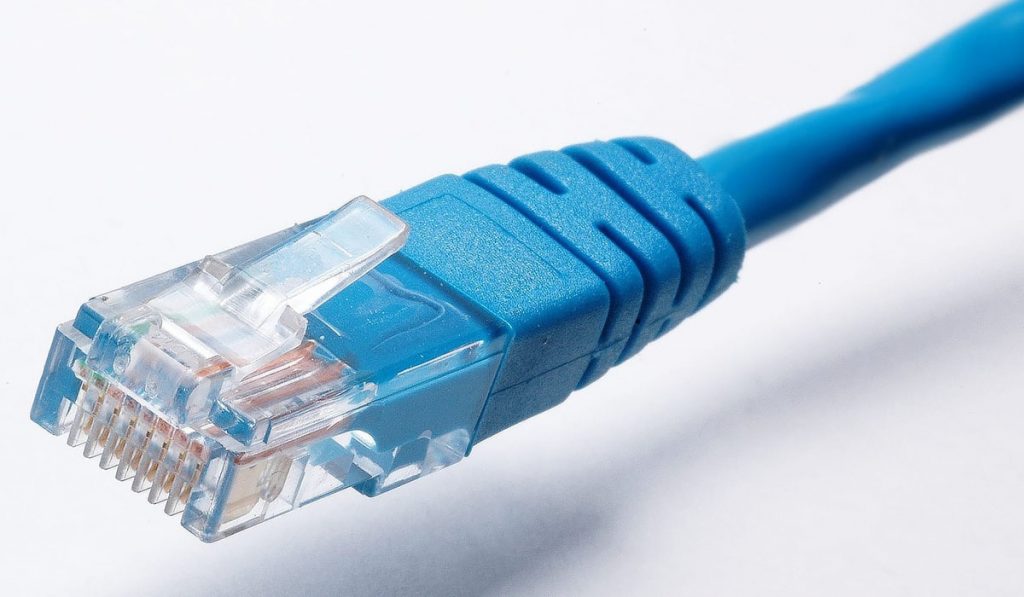

Ethernet cables consist of eight small wires paired together in a sleeve of protective insulation. These wires are usually color-coded. More often than not, they will follow a solid/striped pattern for easy distinction.
To splice ethernet/CAT5 cables:
- Use your wire cutters to remove several inches of your plastic insulation. You want to make sure you have enough of the small paired wires to work with to perform a proper splice.
- It is a good idea to slip a short segment of heat shrink tubing over one of the wires. This will make sure it’s already set up when you need to cover the wires to finish the splice.
- Working one color-coded pair at a time, use your strippers to peel away a small section of the wire. This should expose the core.
- Using either your butt crimp or soldering tools, combine the two small wires. They will be very thin so make sure you are taking your time to make the connection.
- Tape up each splice to protects against shorts.
- Continue until you have finished all eight splices.
- Now slide the heat shrink tubing onto the completed splices and tighten.
For a more detailed video explanation, check out the video here.
How to Splice RG59 Cable
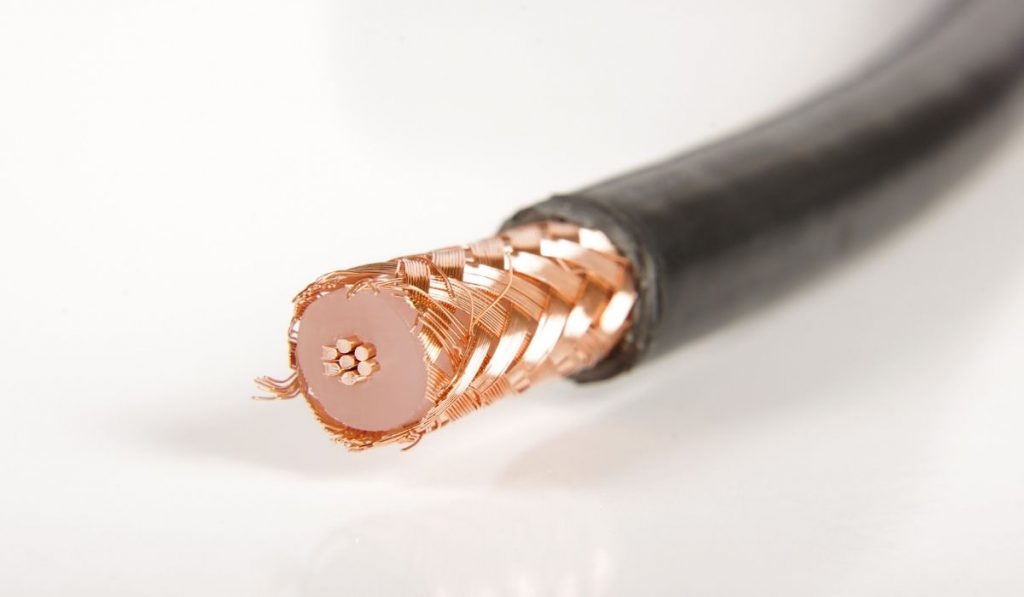

The process for splicing an RG59 cable is very similar to the ethernet cable. The significant difference is with the RG59 you are dealing with one primary wire wrapped in insulation. These cables are shielded coaxial cables.
They are layered like so:
- An outer layer of insulation
- A braided layer
- A layer of shielding
- Another layer of insulation
- A solid copper or braided core
You will need to carefully move through each layer’s stripping process, making sure to keep as much intact for the splice.
You will need to:
- Strip and peel back the first layer of insulation then slip two pieces of heat shrink tubing on one end of each cable.
- When cutting the braided layer make sure to leave enough to splice together. Twist and pull the fine strands back to move them out of the way.
- Remove the shielding layer and carefully cut the thick insulation that houses the main copper wire. Make sure to be very careful not to damage the core.
- Repeat these steps for the other cable.
- Use a butt crimp or soldering equipment to connect the two main core wires. Wrap in tape to secure, then slip over one of the heat shrinks.
- Use a larger butt crimp or solder the braided wires back together.
- Slipover the other heat shrink and secure.
- A final layer of electrical tape will finish off the splice.
Here is a video tutorial for more information.
Tips & Tricks
- Learning how to splice a wire will save you money in the long run. It allows you the option of working with bulk wire instead of relying on cables already fitted with connections.
- Depending on your budget and job, it may be a better option to pull new cables instead of splicing the old ones. This should be done if you don’t think the cables are good quality or you don’t have enough slack in the lines to perform proper splice.
- It is a good idea to tackle other issues while dealing with your cables. If you notice the holes cut for the wiring are not correctly sealed, now would be an excellent time to use some silicone caulk (on Amazon) to patch up the spots.
- Help your future self in any security camera-related projects by making sure you are creating a clean and organized cable system. Using wire stays (on Amazon) can be a great way to keep cables where you want them.
- Securing all of your splices or couplers in electrical tape is a great practice. It makes sure your work will stay put. Just a few extra layers of tape be the difference between a durable splice and one that needs to be fixed in a few months.
- If you are running cables outside, make sure your first check what kind of cables you will need. RG59 is more robust and durable than regular ethernet cables, but specially designed outdoor ethernet cables are available. Access your needs before making any purchases.
- Depending on your project, you may need to extend your cables. Keep in mind there are limitations to each cable’s usable length. For ethernet cables the distance is around 300ft; for RG59, it is about 1000ft. Keep in mind that this does not take power cables into account.
- Use quality cables. When dealing with HD video content it is imperative to make sure you are using the right type of cables. There are security camera specific cables you can buy, also, there are devices that allow you to convert things like an Echo Show so it can be used as a security camera (our guide).