
The Nest Thermostat is a popular smart thermostat that’s compatible with several systems and includes many useful features. However, some homeowners are curious whether they can install a Nest Thermostat without a C-wire.
It’s possible to install a Nest Thermostat without a C-wire, but be sure to use an adapter that’s compatible with your Nest and HVAC system instead. You can find compatible adapters online for under $50. The setup is simple and can usually be finished in under 30 minutes.
Don’t be too intimidated if you’re attempting to install a Google Nest Thermostat without a C-wire. Using an adapter is a simple solution that’s convenient and affordable. Let’s go through everything you need to know.
What Is a C-Wire?

A C-wire, also known as a ‘common wire,’ provides continuous electricity to a smart thermostat and draws energy from the furnace or heating/cooling system. The continuous supply of power provided by common wires is extremely useful.
C-wires ensure your thermostat doesn’t need to be recharged, and that you have a stable WiFi connection. Common wires are typically required for most smart WiFi thermostats.
Can I Install a Google Nest Without C-Wire?
Yes, it’s possible to install a Google Nest Thermostat (on Amazon) without a C-wire. Instead, you can use a C-wire adapter that’s similar to a standard C-wire and doesn’t require intensive wiring.
However, there are some considerations to be aware of, and although Nest states that a C-wire isn’t necessary, it’s still advised to have one.
Many Nest Thermostat owners encounter issues when they use the device without a proper C-wire. After all, the C-wire ensures the thermostat can maintain power without interrupting other components used to turn the device on and off.
This setup can be essential for maintaining a WiFi connection to the thermostat without rapidly draining the battery. The C-wire allows your thermostat to function better and prevents common issues like the delayed message error.
Do All Nest Thermostats Need a C-Wire?
Google Nest Thermostats are constructed to operate without a C-wire in most environments. However, some systems may need a C-wire for continuous power.
Different devices and different homes will have various requirements. You can use the Nest Compatibility Tool online to determine if your system and Nest Thermostat require a C-wire.
What Is a C-Wire Adapter and Where Can I Get One?
A C-wire adapter serves the same purpose as a C-wire and works as a stand-in if you don’t have one. The adapters are popular solutions, as they can save you the time of installing a common wire connection to your HVAC system and Thermostat.
You can find plenty of options online at affordable prices under $50.
For example, the 24 Volt Power Adapter (on Amazon) is compatible with several smart thermostats, including the Nest Thermostat. It has a 25-foot cable, and according to reviews, it’s incredibly easy to install.
Alternatively, you can purchase officially licensed products like the Nest Power Connector (on Amazon) for a similar price. Either way, C-wire adapters are typically easy to install as long as you read the instructions and have the necessary tools.
Be sure the product is compatible with your system before purchasing to avoid unnecessary headaches.
How Do I Install a Nest With a C-Wire Adapter?

The steps to install a Nest Thermostat with a C-wire adapter are relatively simple. The process can be completed in under 30 minutes, and we’ll cover the steps in more detail below.
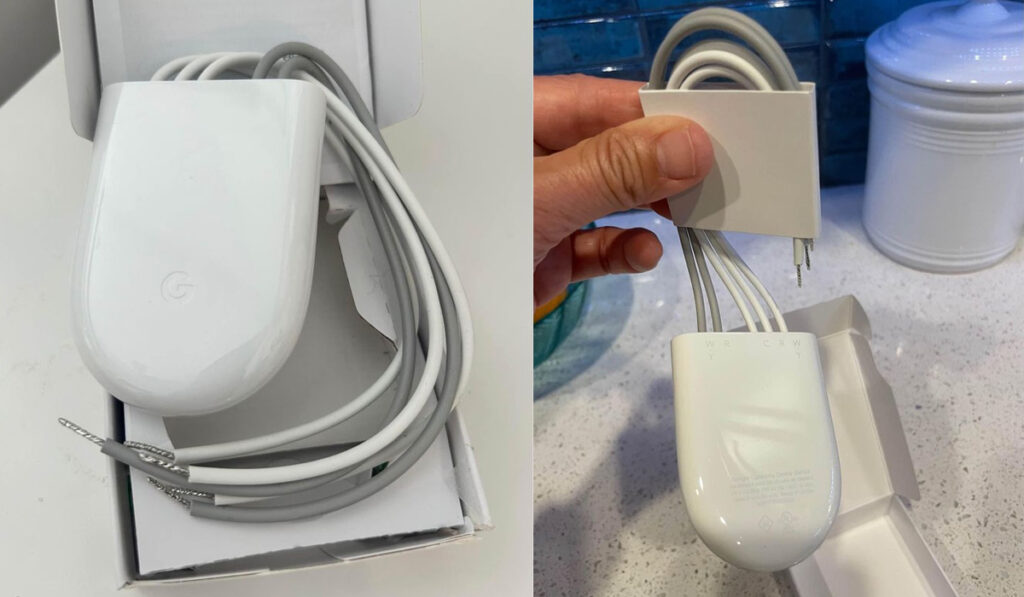
Step 1: Purchase the Adapter
The first step is to purchase and gather your C-wire adapter. As mentioned earlier, there are several options available online at nearly any price point. Just be sure the product is compatible with your Nest Thermostat and system before starting.
Step 2: Inspect the Thermostat Terminals on Nest
Unscrew the top of your Nest Thermostat to see the various terminals. The terminals can vary depending on the model, but the layout will be similar across all devices.
The primary terminals you need to consider include the following:
- Rh Terminal: This terminal is used for power.
- G Terminal: This terminal is the controller for the fan.
- Y1 Terminal: This terminal controls the cooling loop.
- W1 Terminal: This terminal controls the heating loop.
The Rh Terminal is only utilized for powering the device and finishes the circuit for the Nest device.
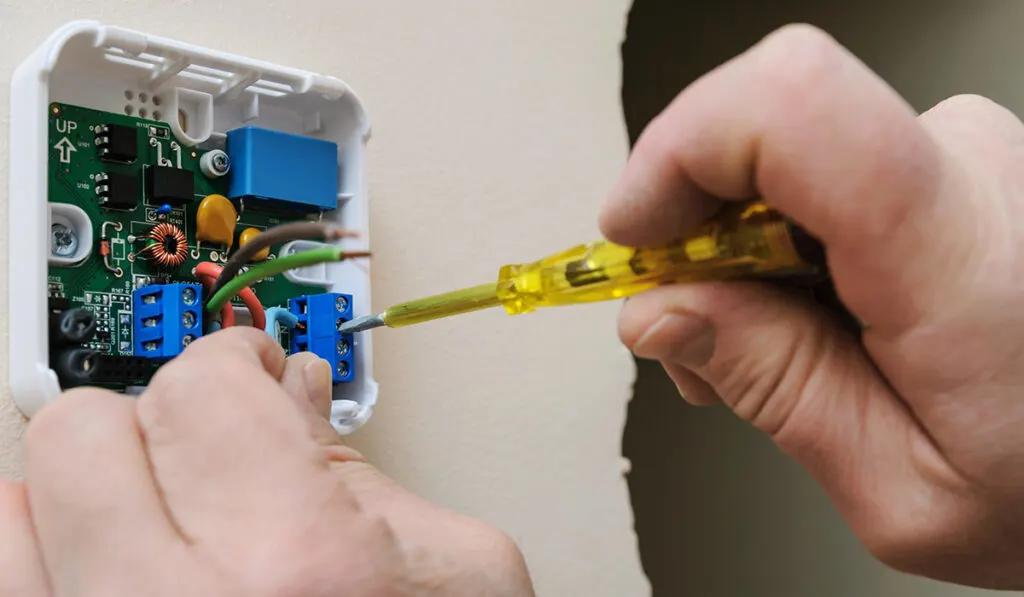
Step 3: Adjust the Connections to Your Nest Thermostat
Now that you’ve revealed the terminals, you can begin installing the Nest Thermostat. Be sure that you’ve turned off the power to your heating/cooling system before you start any wiring.
You’ll also want to make a note of the wiring of your old thermostat before you remove it. This is an important step, as the same wires must be connected to the correct terminals on your new thermostat. You can take a photo or jot down notes so you don’t forget.
You’ll need to connect the corresponding wires to W1 if you have a heating system to create a connection to your furnace.
For cooling systems, you’ll need to connect a wire to Y1. You can connect the wire to the G Terminal if you have a fan.
Step 4: Attach the Adapter to Your Nest Model
As we stated earlier, make sure your connections are identical to your old thermostat, except for the following:
- It’s important to disconnect the previous Rh wire. Instead, use a wire from the adapter and link it to the Rh Terminal.
- You must use the second wire from the adapter and connect it to the C Terminal. The wires you use to attach to the Rh or C Terminal do not matter.
Ensure all the wires are connected correctly and tightly. Don’t leave any copper parts of the wire exposed outside of the terminal.
Also make sure that only the insulation of the wires is exposed on the exterior of the terminal.
After these steps, you’ve established a complete circuit whereby power from the Rh to the C wire can energize the thermostat continuously.
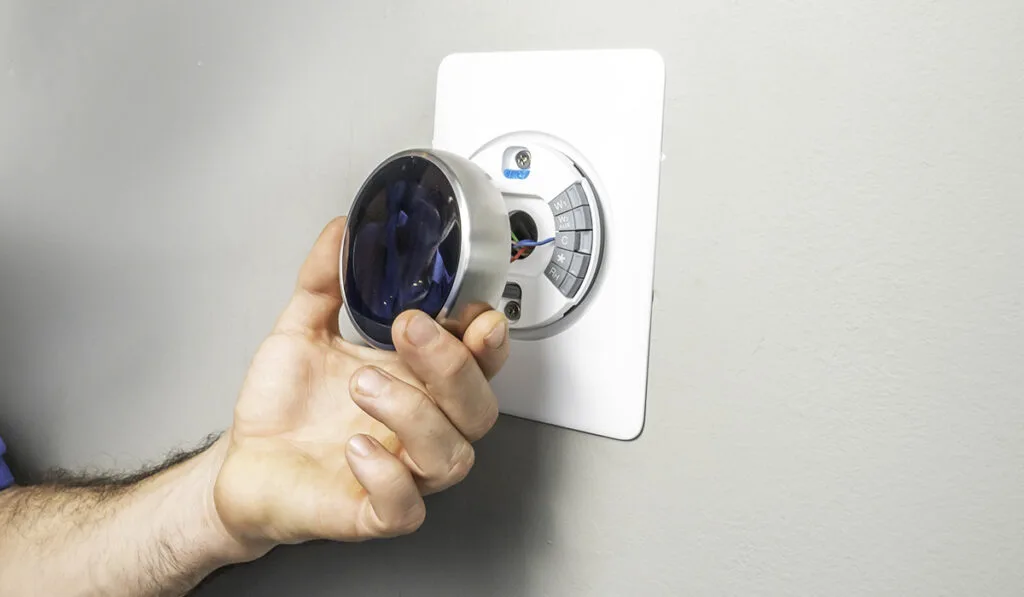
Step 5: Attach the Thermostat to Your Wall
After completing the correct connections, you can attach your Nest Thermostat to the wall. Ensure that the power source is still disabled until you’ve finished placing the thermostat to prevent short circuits and damage.
Because the wiring is low-voltage, there isn’t much for concern, but it’s always better to be safe than sorry.
Step 6: Boot Up Your Thermostat
Once the Nest Thermostat is in place, you can plug the device into a traditional power outlet and boot it up. If the device begins to flash, then you’ve successfully wired the thermostat, and it’s ready to set up.
Other Options for Thermostats That Don’t Require a C-Wire

Without a C-wire or adapter, the Nest Thermostat will charge itself from your HVAC systems wiring. Unfortunately, this can cause issues over time. If you can’t install a C-wire or use an adapter, there are a few DIY solutions available:
- You can connect the heating wire (W) to the C Terminal during the hotter months or connect the cooling wire (Y) to the same terminal in the colder months. However, this process can be a hassle for most homeowners and isn’t a long-term solution.
- You can attach the fan wire (G) to the C Terminal, but you won’t have the option to use your fan by itself. The fan will only work when the HVAC is turned on, which isn’t a long-term solution for most homeowners.
These are some DIY-friendly solutions you can use to connect your Nest Thermostat without a C-wire.
However, these solutions aren’t viable for the long term and can cause more frustration in the long run. Instead, the best solution is to use a C-wire adapter or have a C-wire professionally installed.
This way, your system will work as intended, and you won’t have to manually adjust your thermostat throughout the year.