
Unlike every other gaming console, Nintendo Switch does not support a direct Ethernet connection. Instead, it comes with the best Wi-Fi reception to provide an interruption-free gaming experience. Of course, you might already know how 5 GHz Wi-Fi has blown away the latency of 2.4 GHz, and our favorite Nintendo switch supports both of these bands.
To connect a Nintendo Switch to 5 GHz Wi-Fi, first check if your router is compatible and enable the 5 GHz Wi-Fi band through the router interface. Then go to Nintendo Switch’s internet setting and connect to the new 5 GHz Wi-Fi network. Type in your password, and your Nintendo Switch will connect.
Nintendo’s rival, Sony’s PS4 Pro and PS4 Slim models, support 5 GHz, while Microsoft’s Xbox One S and One X also provide a 5 GHz wireless internet connection. This amazing connectivity is also how Nintendo has placed itself in the same category as these big gaming consoles. This article will show you how to connect Nintendo Switch to a 5 GHz Wi-Fi network and enjoy a fantastic gaming experience.
How to Connect Nintendo Switch to 5 GHz Wi-Fi?

Connecting a 5 GHz Wi-Fi to Nintendo Switch (Amazon) is just like connecting any typical Wi-Fi to your device. But there are a few things that you need to take care of before establishing the connection.
To begin, double-check that your router supports 5 GHz Wi-Fi (instructions below). Dual-band routers are very common, and they’re compatible with both 2.4 GHz and 5GHz.
Consult the router’s manual for verification, or a simple Google search will do. Most routers, like the TP-Link AC1200 Archer (on Amazon) will clearly state if they have 5 GHz as a feature.
Assuming that your router supports 5 GHz Wi-Fi, you now need to check if the band is enabled on the router. This is usually visible on the router’s interface setting, and you can find it by logging in to the router’s web page.
And at this point, note our other resources on this topic that you may need to have handy: check out what we have to say on how to increase Nintendo Switch download speeds, what to do if you can’t connect to WiFi at all, or what to do if your Switch is lagging or the internet connection just feels bad.
How to Check If the Band is Enabled On the Router
- Type your “IP Address” in the browser’s address bar and hit enter. Your router’s interface window will open. (Pro tip: if you don’t know your router’s IP address and it’s not printed on a sticker on the side of the device, you can google the make and model of the router to find it’s default IP address!)
- Type the “Username” and “Password.” It’s written on the back of your router. It’ll take you to the configuration page.
- Select the “Wireless” option on the configuration page and click on the “5 GHz” option.
- Make sure it’s turned on. Now, you can see the 5 GHz network’s name and band.
- If you want, change the name and password. Remember the SSID (Network Name) – that’s what you will use to connect Nintendo Switch to 5 GHz Wi-Fi.
Once your router is broadcasting in 5 GHz mode, it’s time to connect your Nintendo Switch to the 5 GHz band. Before that, make sure you are near the router because 5 GHz has a pretty low range compared to 2.4 GHz WiFi networks. Your Switch won’t be able to detect the signal if you’re too far away from the router.
And do note these are general steps. With different routers from different companies, the details might be slightly different.
How to Connect Nintendo Switch to Your 5 GHz Wi-Fi Network
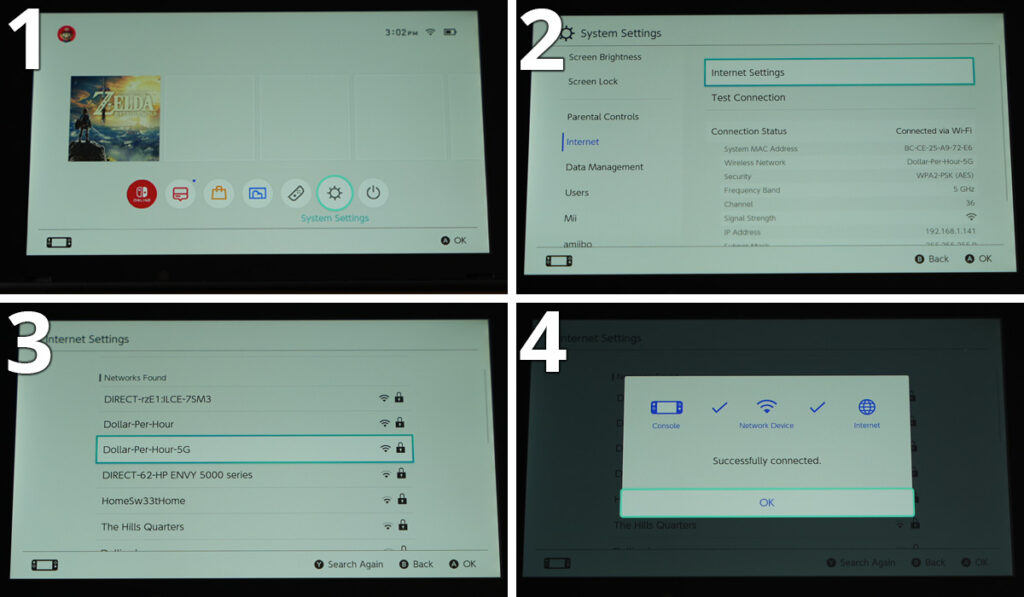
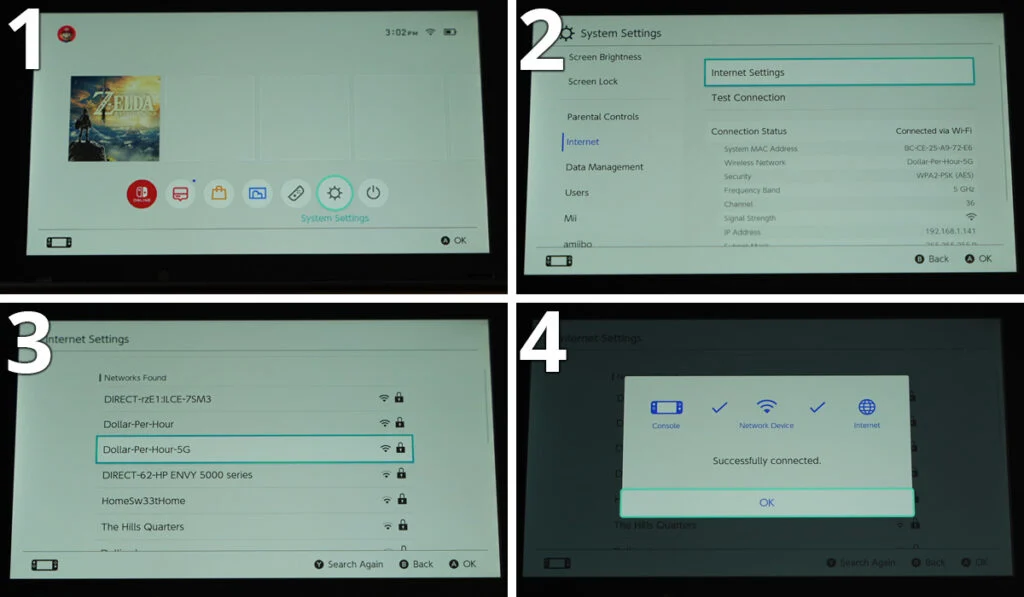
- Turn on your Nintendo Switch and open the “System Settings” on the home menu.
- Select the “Internet” option on the scroll-down window. On the right side of the window, select “Internet Setting” and then tap on “Connect to a wireless network.”
- The Switch will start scanning for any available wireless networks. Once it finds the network with the SSID we noted earlier, select it and tap on “connect” (If it can’t find your network you’re probably still too far from the router).
- Enter the password, and then hit OK. After a few seconds, the Switch should connect to the WiFi network, and you should be online with a 5 GHz Wi-Fi network.
What are the Benefits of Connecting Nintendo Switch to 5 GHz?

People who have switched to 5 GHz will tell you how much their gaming experience has improved. Let’s see why.
Faster Connection Speeds, Reduced Lag
Latency, or lag, is the biggest issue with gaming over Wi-Fi, and if you have played those multiplayer games online, you would know how frustrating it can be. However, 5 GHz provides a transmission speed of up to 1300Mbps, almost 3x faster than the standard 2.4 GHz band. That said, many users report that the Switch won’t actually use this much speed/bandwidth when available, but it will use more on a 5GHz network than on a 2.4GHz one, typically.
Thus, it significantly reduces latency and gives you a much smoother gaming experience.
The stable signal strength of 5 GHz further improves your gaming experience. 5 GHz Wi-Fi produces smaller waves that do not cover a large area, but these are stronger than 2.4 GHz long waves. So your connection won’t drop frequently.
Less Interference
On top of this you are diverting all your WiFi traffic into two different highways now. Household devices like cordless phones, baby monitors, and other gadgets usually operate on 2.4 GHz frequency, so they don’t interfere with 5 GHz Wi-Fi.
Usually, mobile phone laptop users don’t use 5 GHz as the primary network, so even if you are in a crowded space like a dorm or office, you’ll still be able to connect to 5 GHz without any interference.
Better Range
While 2.4 GHz networks can offer better range than 5 GHz networks, this is not always the case. In some situations, a 5 GHz network may offer better range, especially in areas where there are many other Wi-Fi networks operating on the 2.4 GHz frequency.
If you have lot’s of devices crowding the 2.4GHz spectrum, you won’t get the “sticker” range anyways because of interference, so moving to the less crowded 5GHz network can get you effectively better range.
Why Will My Nintendo Switch Not Connect to 5 GHz (Troubleshooting)?
If you’ve followed our instructions on setting up a 5 GHz connection and your Nintendo Switch is still unable to connect, several things could be wrong.
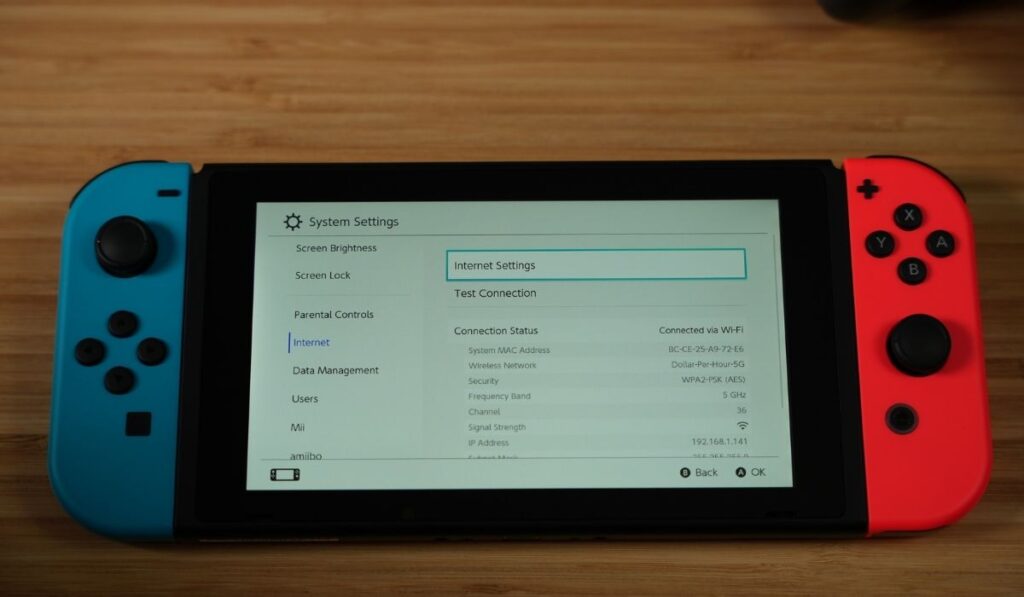
Nintendo Switch has a “Diagnose” function to check and solve any connectivity problems. To run the program, go to the “System Settings” on your Nintendo Switch and select “Internet.”
There, you will see the “Test Connection” button. Press it and follow the on-screen instructions to resolve any issue. Alternatively, below are some of the most common problems and their solutions.
The Router is Not Broadcasting a 5 GHz Wi-Fi Network
Make sure your router is compatible with 5 GHz Wi-Fi. Check the router’s specs or contact customer support to inquire. Also, look at the router’s user interface as we have previously described.
In addition, dual-band routers produce two Wi-Fi signals (2.4 GHz and 5 GHz) simultaneously unless you have manually split them or turned off one band. Each of these signals has its own SSID and password. Therefore, when connecting your Nintendo Switch to a 5 GHz band, make sure you are using the right credentials.
Wi-Fi Settings are Incorrect
Sometimes, small glitches can interfere with and stop Nintendo Switch from connecting to 5 GHz Wi-Fi. Make sure the network you’re trying to connect is set as “private” and not as “public.” To do this, go to the “Settings” menu on your router interface and find the “Security” settings. There you can change your network to “Private” and save the settings.
The Router is Too Far Away
Unfortunately, 5 GHz Wi-Fi signals have a shorter range than 2.4 GHz signals. It only travels 60-90 feet in open space and cannot penetrate the walls well. If you are away from the router or have lots of objects between the Nintendo Switch and the router, you might experience weaker signals and more connection drops.
You are Connecting to a Crowded Wi-Fi Channel
If there are a lot of other 5 GHz Wi-Fi networks broadcasting in your area, then it’s possible some of those networks are overlapping Wi-Fi channels.
This can cause signal interference and significantly reduce your connection speeds. To avoid this problem, change the channel of your 5 GHz Wi-Fi network on your router through the interface.
Typically 5 GHz Wi-Fi networks can use a channel between 32 and 177. You can use a Wi-Fi analyzer app on your smartphone to see what the least used WiFi channel around your home is, then switch your Wi-Fi network to that channel.
Automatic DNS Setting is Not Working
If the above solutions don’t work for you, it is possible that the DNS setting on your Nintendo Switch is incorrect. To check and fix this, go to “System Settings” on your Nintendo Switch, then select “Internet.”
There, you will see your 5 GHz network, tap on it, and select “Change setting.” Then scroll to “DNS settings,” where you will find “Automatic” and “Manual.” Select “Manual” and save the setting.
Airplane Mode is On
Nintendo Switch has the option to switch to “Airplane Mode” to play games offline. However, your device will not link to any Wi-Fi when it is switched on.
To turn it off, go to the “Settings” in the menu and tap on the “Airplane mode” option to turn it off.
Minor Bugs
Sometimes, rebooting the device can fix the connection issue. Press the power button for 3-5 seconds, tap on “Restart” on the screen, and it’ll reboot your device. Also, try restarting your router.
We hope one of these solutions works for you. However, if you still have any problems, contact the customer service of your router and Nintendo Switch – they might be able to help you further.
Can My Nintendo Switch Automatically Connect to 5 GHz?
If you’re connecting 5 GHz Wi-Fi with your Nintendo Switch for the first time, it’ll not connect automatically. Instead, you’ll have to add the network to your device and type its password manually.
We have explained how to do this in the first part of this article. Please refer to our solutions if you encounter any issues while setting up a 5 GHz connection.
After you have set up a 5 GHz connection on your Nintendo Switch, it will remember the network for the future. You’ll only have to turn on the device Wi-Fi, and it will automatically connect to 5 GHz Wi-Fi without having to enter any passwords.
We hope the article helped you solve Nintendo Switch 5 GHz connection issues. If you have more questions about Nintendo Switch, check out our other articles. We have everything from the basics to in-depth guides about the device.
How to Check if Your Wi-Fi Router Supports 5 GHz Networks
Before attempting to connect your Nintendo Switch to a 5 GHz Wi-Fi network, you’ll need to make sure that your Wi-Fi router supports this frequency. Here’s how to check:
- Open your web browser and enter your router’s IP address in the address bar. This is typically listed on the bottom of your router or in the user manual. If you don’t have the IP address, you can usually find it by searching for your router model online.
- Enter your router’s login credentials when prompted. If you haven’t changed these, they are likely the default username and password listed in the user manual.
- Look for a setting labeled “Wireless” or “Wi-Fi”. This may be located under a “Settings” or “Advanced” tab.
- Look for a setting labeled “Frequency Band” or “Wireless Band”. If your router supports 5 GHz networks, you should see an option to enable this frequency.
- If you’re not sure if your router supports 5 GHz networks, check the manufacturer’s website or user manual for more information.
Getting (And Staying) Connected
As we’ve seen, connecting your Nintendo Switch to a 5 GHz Wi-Fi network can offer several benefits, including faster connection speeds, less interference, and better range.
By following the steps outlined in this article, you can easily connect your Nintendo Switch to a 5 GHz network and enjoy a more stable and reliable connection.
Remember to check if your Wi-Fi router supports 5 GHz networks before attempting to connect, and troubleshoot any issues that may arise. With these tips, you’ll be able to take your gaming experience to the next level and enjoy all that the Nintendo Switch has to offer.